Options Menu
I may be running out of options, but running out isn’t an option.
– Mark Lawrence, Prince of Thorns
To further showcase our new state system, let us create an options menu to allow the user to change the full-screen state, to set the game resolution and to pick their own keybindings.
Boost Preprocessor
Since getting the strings of enum variables is a bit tedious when done using a switch, I used the boost preprocessor to create enums with an automatic toString function:
#include <boost/preprocessor.hpp>#include <boost/preprocessor/wstringize.hpp>
namespace input{  // use boost to define enums with strings
  // this first macro is used internally by the second one#define ENUM_TO_STRING(r, data, elem)    \    case elem : return BOOST_PP_WSTRINGIZE(elem);
  // this second macro first generates the enumeration and then generates a ToString function  // that takes an object of that type and returns the enumerator name as a string  // obviously this implementation requires that the enumerators map to unique values)#define ENUM_WITH_STRING(name, enumerators)                \    enum name {                                                               \        BOOST_PP_SEQ_ENUM(enumerators)                                        \    };                                                                        \                                                                              \    inline const wchar_t* getGameCommandAsString(name v)              \    {                                                                         \        switch (v)                                                            \        {                                                                     \            BOOST_PP_SEQ_FOR_EACH(                                            \                ENUM_TO_STRING,                                               \                name,                                                         \                enumerators                                                   \            )                                                                 \            default: return "[Unknown " BOOST_PP_WSTRINGIZE(name) "]";        \        }                                                                     \    }
  // define the game commands  ENUM_WITH_STRING(GameCommands,                      (Select)\                            (Back)\                            (ShowFPS)\                            (MoveLeft)\                            (MoveRight)\                            (MoveUp)\                            (MoveDown)\                            (Shift)\                            (Preview)\                            (nGameCommands))
  // define application events  ENUM_WITH_STRING(Events,                  (StartApplication)\                        (PauseApplication)\                        (ResumeApplication)\                        (QuitApplication)\                        (SwitchFullscreen)\                        (WindowChanged)\                        (ChangeResolution)\                                                (nApplicationEvents))}
This might look weird, and it obviously is a bit more work than just defining an enum, but the ease of use easily beats the added implementation time.
The first macro ENUM_TO_STRING is internally used by the second one. The second macro ENUM_WITH_STRING first generates the enumeration, then generates a toString function called getGameCommandAsString that takes a GameCommand as input and returns the enumerator name as a string, using the first macro to stringify enumeration elements into wide chars. Note that this implementation obviously requires the enumerators to map to unique values.
Defining the actual enumerations is easy enough, as you can see, but the real power comes from the ease of use:
First notice that I like to add a count at the end of each enum, for example nGameCommands to be able to easily loop through the enum:
// create action text layouts for (unsigned int i = input::GameCommands::Select; i < input::GameCommands::nGameCommands; i++) if (!addTextToActionTextLayoutList((input::GameCommands)i).wasSuccessful()) return std::runtime_error("Critical error: Unable to create header action text layouts!");And retrieving the string values of an enum is now as easy as it gets:
util::Expected<void> KeyMapMenuState::addTextToActionTextLayoutList(input::GameCommands gameCommand){  std::wstring text = input::getGameCommandAsString(gameCommand);
  Microsoft::WRL::ComPtr<IDWriteTextLayout4> textLayout;  util::Expected<void> result = d2d->createTextLayoutFromWString(&text, textFormat.Get(), (float)dxApp->getCurrentWidth(), 100, textLayout);  if (!result.isValid())    return result;  actionTextLayouts.push_back(textLayout);
  // return success  return { };}
Just have fun with the new enums! Thanks, Boost!
Updated Buttons
First, please note that the game buttons have been updated. The most important updates are that the buttons can now hold four animation cycles, one for each state, deselected, selected, clicked and locked, and that a button is now only clickable if it is not locked:
util::Expected<bool> AnimatedButton::click(){  if (state == ButtonStates::Locked)    return true;
  if (nAnimationCycles > 2)    sprite->changeAnimation(2);  state = ButtonStates::Clicked;  return onClick();}
Options Menu State
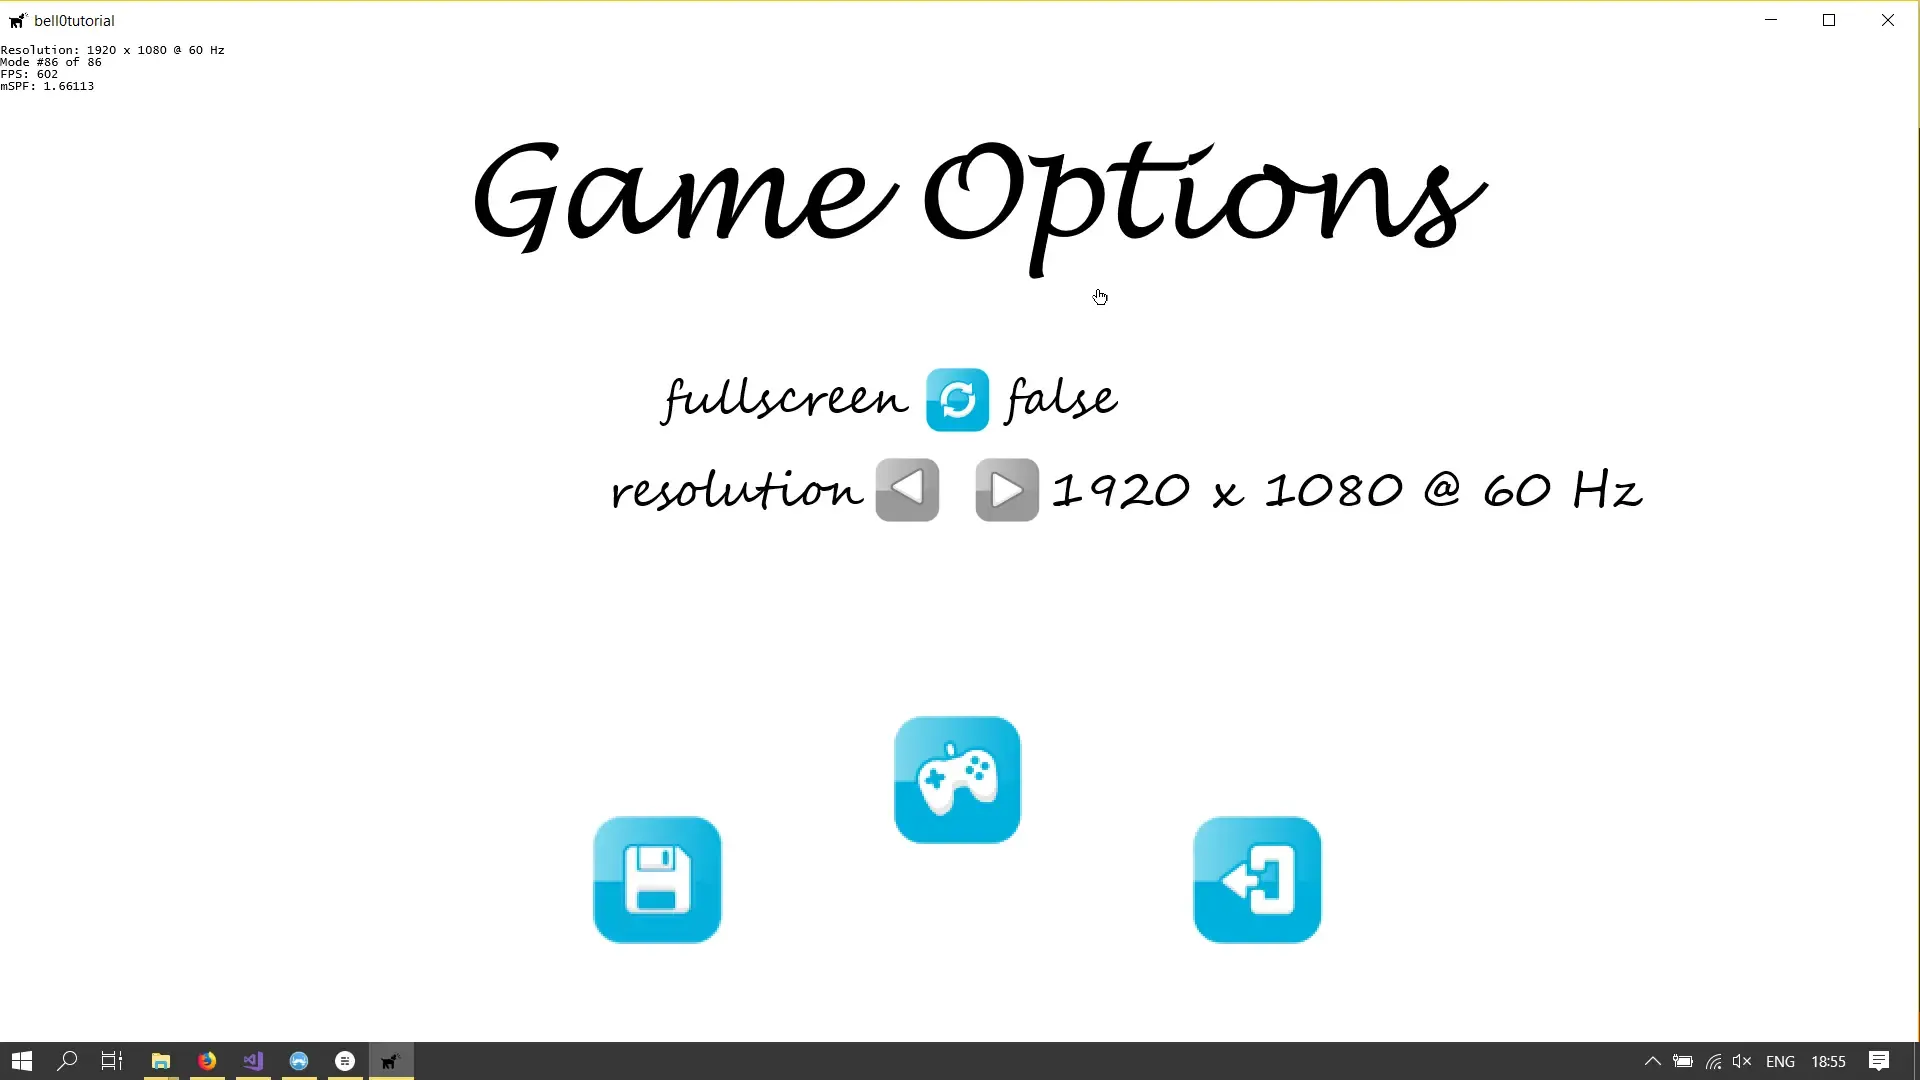
To show the options menu, we will create a new state, the options menu state, where the user can set the full-screen state of the game as well as specify its resolution:

I won’t show the details for each little function in those states, but I will briefly elaborate on the lambda functions of each button as well as the functions that provide the main functionality.
Creating the main navigation Buttons
The Back Button
auto onClickBack = [this]() -> util::Expected<bool>{ this->isPaused = true; if (!dxApp->changeGameState(&UI::MainMenuState::createInstance(dxApp, L"Main Menu")).wasSuccessful()) return std::runtime_error("Critical error: Unable to change game state to main menu!"); return false;};This is an easy button to implement. We simply change the game state to the main menu, meaning that we delete all other states. Note that a return value of false notifies the observer stack of the input handler that the stack of states was changed.
The Save Button
auto onClickSave = [this]{  // write options to lua file  dxApp->saveConfiguration(supportedModes[currentModeIndex].Width, supportedModes[currentModeIndex].Height, currentModeIndex, fullscreen);
  // activate desired screen resolution and fullscreen mode  if (currentModeIndex != dxApp->getCurrentModeIndex())    dxApp->changeResolution(currentModeIndex);
  if (fullscreen != wasInFullscreen)  {    wasInFullscreen = !wasInFullscreen;    dxApp->toggleFullscreen();  }
    return true;};
When the user clicks on the save button, we write the current options to the LUA file on the hard drive and, if so desired, change the resolution and/or toggle the full-screen state. Please note that in the above screenshot, the resolution buttons are greyed out because the application does not have resizable graphics yet.
The Gamepad Button
auto onClickGamepad = [this]() -> util::Expected<bool>{ // open key map menu if (!dxApp->pushGameState(&UI::KeyMapMenuState::createInstance(dxApp, L"Key Map Menu")).wasSuccessful()) std::runtime_error("Critical error: Unable to push key map menu to the state stack!"); return false;};When the user clicks on the gamepad button, we push another state to the stack, the key map menu state, allowing the user to change the key bindings. Please note that pushing a state to the stack does not delete the previous states; they are simply paused and will be resumed later on.
Toggle Fullscreen
auto onClick = [this] { this->fullscreen = !this->fullscreen; return true; };There is nothing here, the main work is done when the save button is clicked.
Browse Supported Resolutions
To browse through all supported resolutions, we simply implement a left and right button, choosing the next or previous resolution:
auto onClickScreenResolutionLeftArrow = [this]{  if(this->currentModeIndex > 0)    currentModeIndex--;  return true;};
auto onClickScreenResolutionRightArrow = [this]{  if (this->currentModeIndex < this->nSupportedModes-1)    currentModeIndex++;  return true;};
To grey out the buttons once we are at one of the ends of the list, we update their state during the game update as follows:
util::Expected<void> OptionsMenuState::update(const double deltaTime){    ...
  if (currentModeIndex == 0)  {    menuButtons[1]->lock();    if (currentlySelectedButton == 1)      currentlySelectedButton = -1;  }  if (currentModeIndex == nSupportedModes - 1)  {    menuButtons[2]->lock();    if (currentlySelectedButton == 2)      currentlySelectedButton = -1;  }
  // lock resolution buttons for now as we do not have resizable graphics yet  menuButtons[1]->lock();  menuButtons[2]->lock();
  // return success  return {};}
Key Bindings Menu
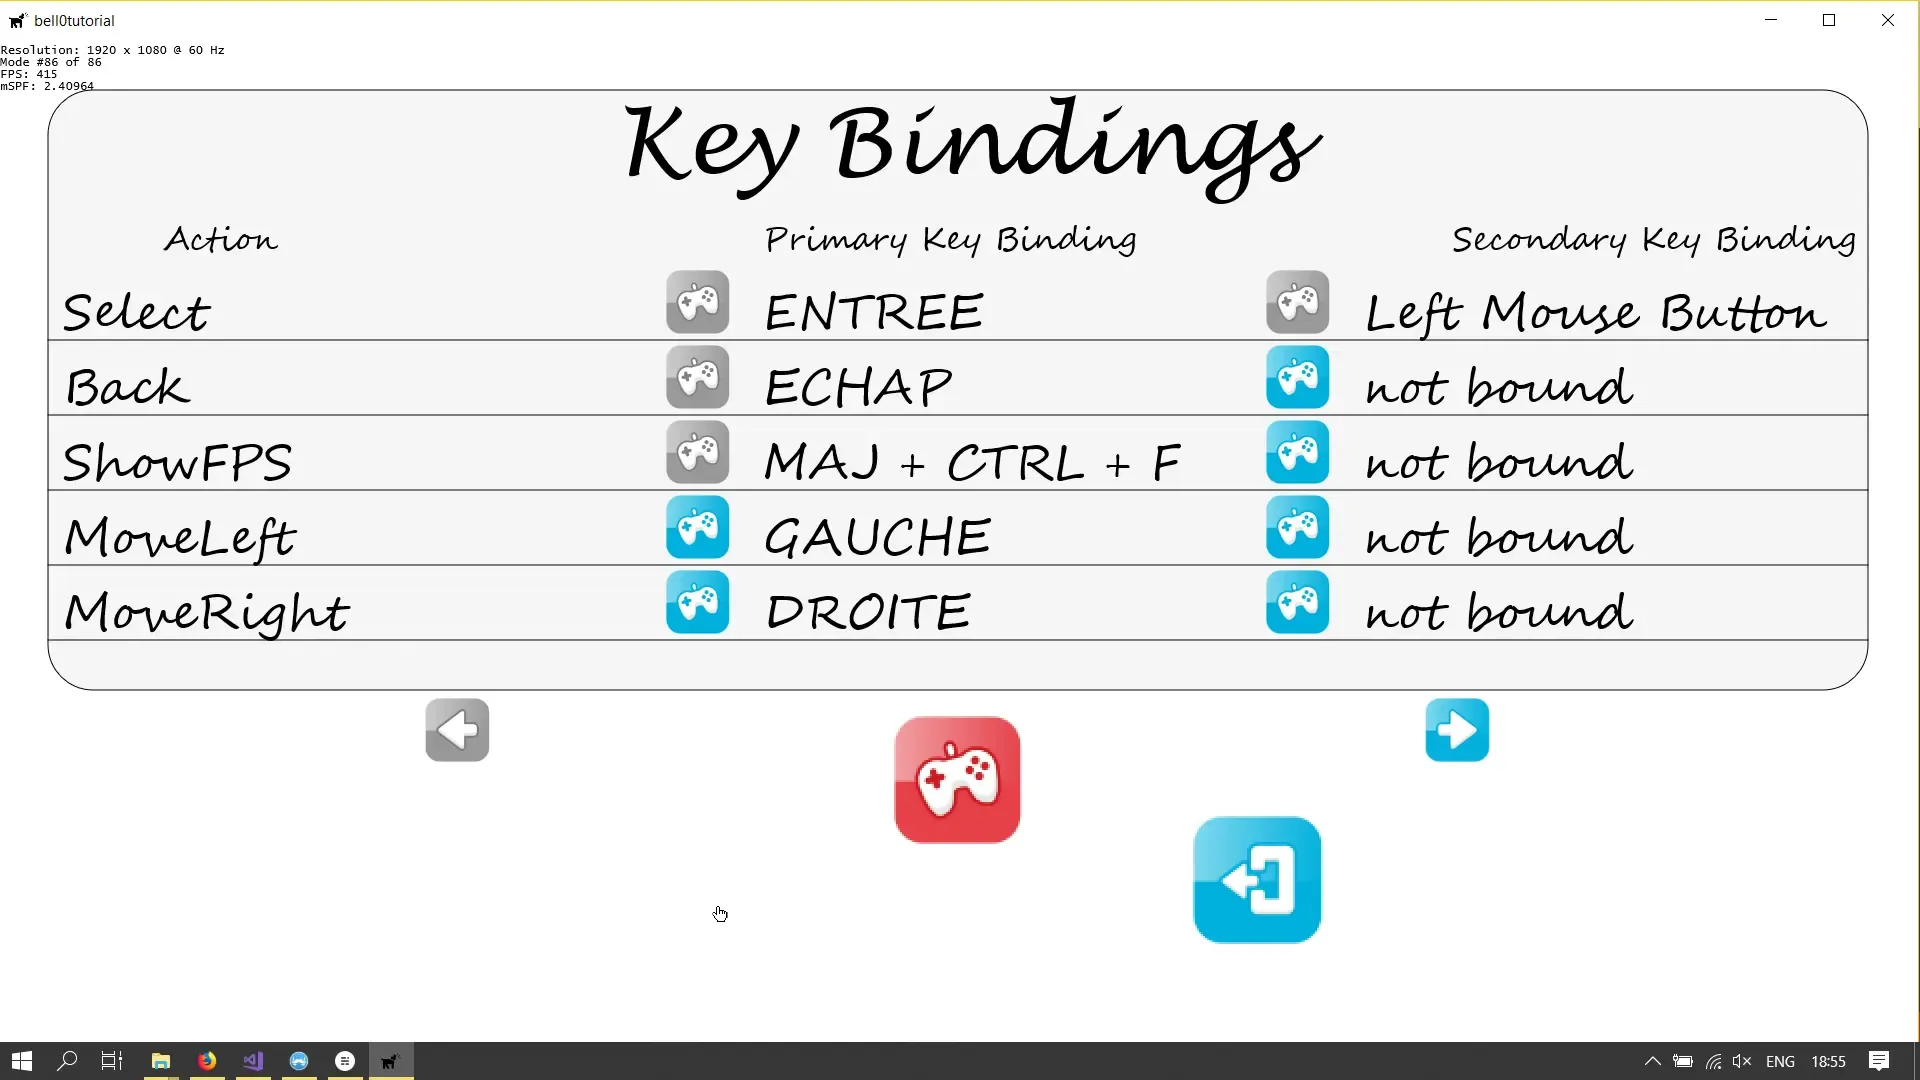
This menu gives an overview of the currently active key maps. Clicking on the gamepad symbol next to a key binding allows the user to select their own mappings:

The Main Navigation Buttons
As you can see, the save button is gone. The new key bindings are saved when chosen during the next state. The gamepad button remains red, as it was clicked before the main menu state went into pause mode. The only button that is left is the
Back Button
auto onClickBack = [this]() -> util::Expected<bool>{ this->isPaused = true; if(!dxApp->popGameState().wasSuccessful()) return std::runtime_error("Critical error: Unable to pop the key map menu!"); return false;};This is easy. We simply pop the current state, the key binding menu, and resume the previous state, the main game options menu.
Pagination
We only show five game commands at once. To navigate through the game commands, we draw two pagination buttons with the following lambda functions:
auto onClickLeft = [this]{  if (currentPage > 0)    this->currentPage--;  return true;};
auto onClickRight = [this]{  unsigned int n = 0;  for (unsigned int i = 0; i < currentPage + 1; i++)    n += keyBindingsPerPage;  if (n < actionTextLayouts.size())    currentPage++;  return true;};
The New Gamepad Buttons
When a small gamepad button next to a key binding is clicked, we enter a new state, the NewKeyBindingMenuState where the user can select a new chord for the specified action:
auto onClickGamepad = [this]{  return this->changeKeyBinding();};
util::Expected<bool> KeyMapMenuState::changeKeyBinding(){  UI::NewKeyBindingState* bindNewKey = &UI::NewKeyBindingState::createInstance(dxApp, L"New Key Binding");
  this->isPaused = true;
  // get currently selected button modulo 9  // 0-8: primary key binding  // 9-17: secondary key binding  bool primary = currentlySelectedButton > 8 ? false : true;  unsigned int gameCommand = currentlySelectedButton % 9;
  std::wstring text = input::getGameCommandAsString((input::GameCommands)gameCommand);
  // get game commands associated with the selected game action  std::vector<input::GameCommand*> commands;  dxApp->getCommandsMappedToGameAction((input::GameCommands)gameCommand, commands);
  // get command (primary or secondary)  if (primary)  {    // primary key binding    if (!commands.empty())    {      // the command already exists -> change the associated chord      bindNewKey->setCommandToChange(commands[0]);      bindNewKey->setOldKeyBindingString(keyBindings1Texts[gameCommand]);      bindNewKey->setGameCommand((input::GameCommands)gameCommand);      dxApp->pushGameState(bindNewKey);    }    else    {      // the command does not exist -> create a new one      input::GameCommand* gc = new input::GameCommand(text);      dxApp->addNewCommand((input::GameCommands)gameCommand, *gc);      bindNewKey->setCommandToChange(gc);      bindNewKey->setOldKeyBindingString(L"not bound");      bindNewKey->setGameCommand((input::GameCommands)gameCommand);      dxApp->pushGameState(bindNewKey);    }  }  else  {    // secondary key binding    if (commands.size() > 1)    {      // the command does exist -> change it      bindNewKey->setCommandToChange(commands[1]);      bindNewKey->setOldKeyBindingString(keyBindings1Texts[gameCommand]);      bindNewKey->setGameCommand((input::GameCommands)gameCommand);      dxApp->pushGameState(bindNewKey);    }    else    {      // the command does not exist -> create it      input::GameCommand* gc = new input::GameCommand(text);      dxApp->addNewCommand((input::GameCommands)gameCommand, *gc);      bindNewKey->setCommandToChange(gc);      bindNewKey->setOldKeyBindingString(L"not bound");      bindNewKey->setGameCommand((input::GameCommands)gameCommand);      dxApp->pushGameState(bindNewKey);    }  }  return true;}
What is happening here is that we chose the appropriate game command, based on which gamepad button was clicked. We then enter the new state with the appropriate game command from the key map to change.
New Key Bindings Menu
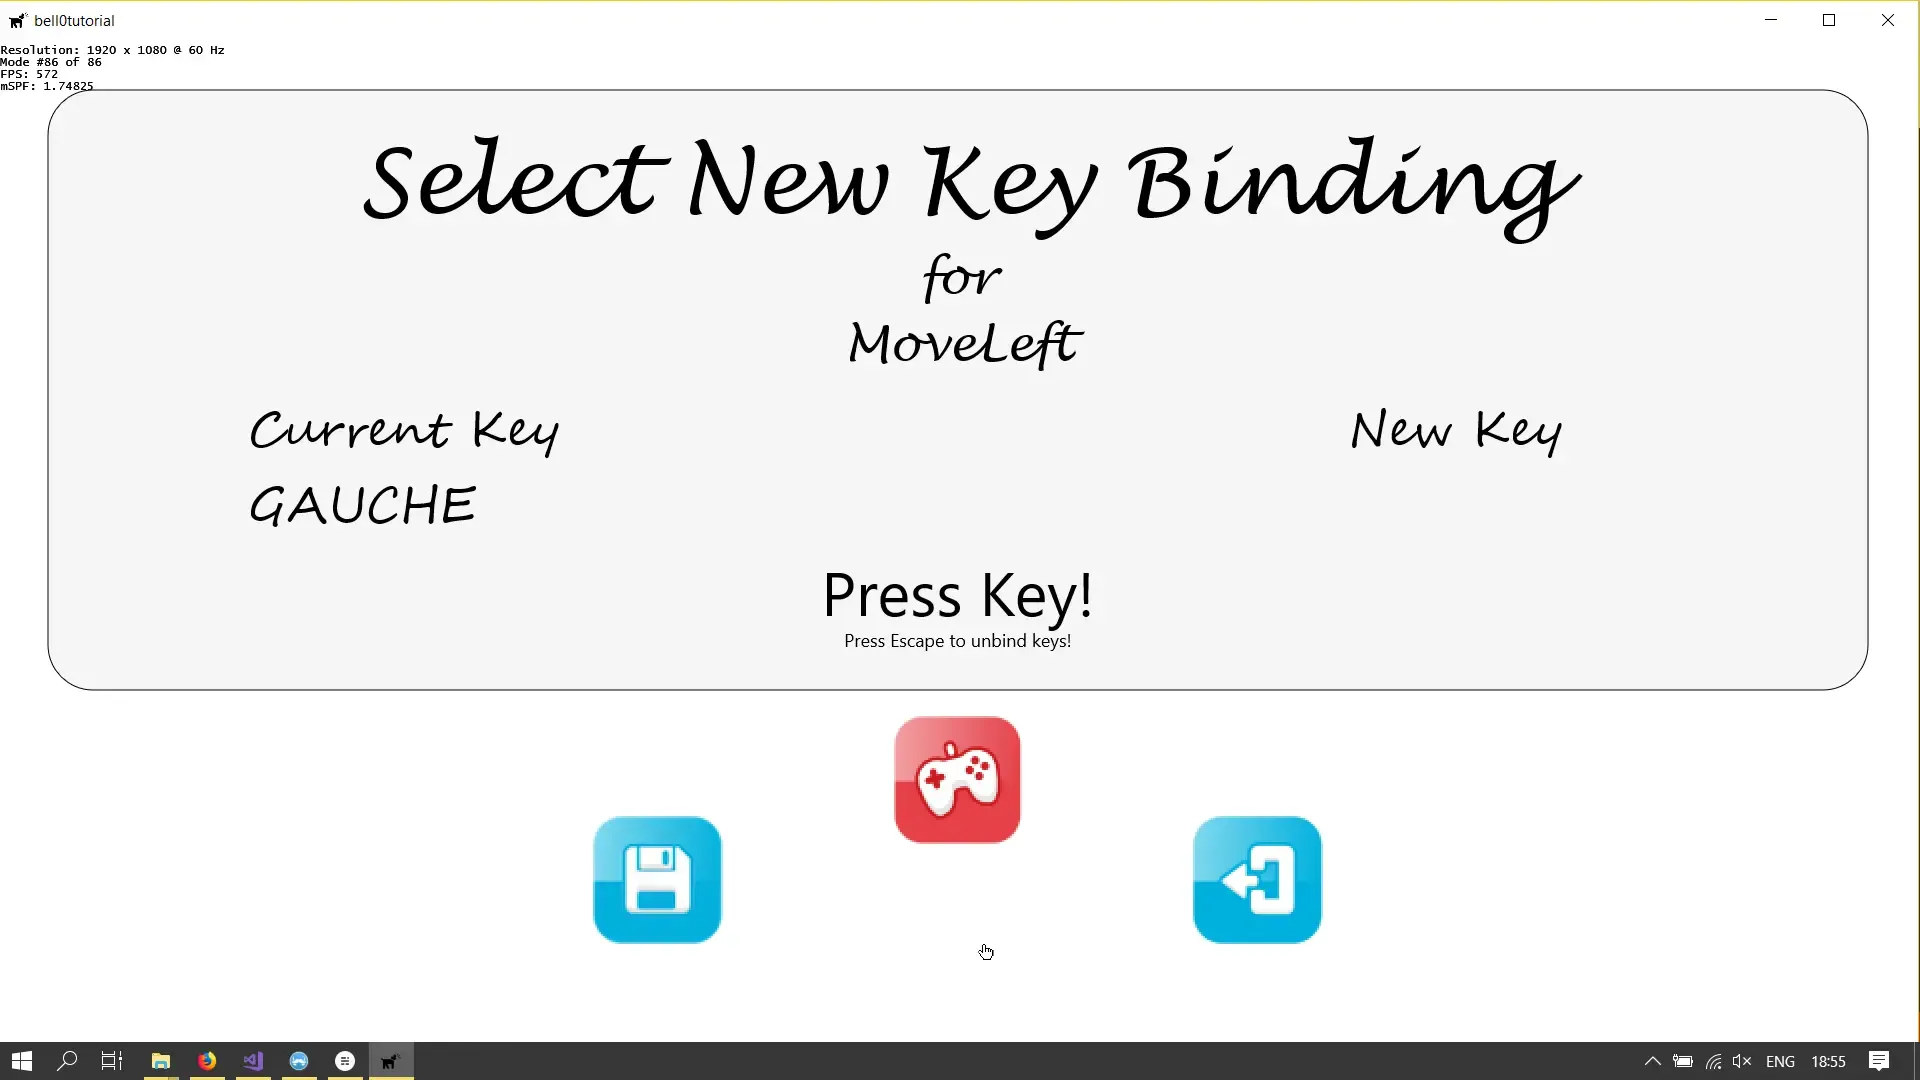
In this menu, the user can choose their own key bindings for the game commands:

The Back Button
The back button is, as always, easy to implement:
auto onClickBack = [this]() -> util::Expected<bool>{ this->isPaused = true; if (!dxApp->popGameState().wasSuccessful()) return std::runtime_error("Critical error: Unable to pop new key bindings state"); return false;};We simply pop the current state from the stack and resume the previous state, the key bindings menu. Note that any new chords the user may have selected are discarded.
The Save Button
auto onClickSave = [this]() -> util::Expected<bool>{ // store the new key binding dxApp->saveKeyBindings(); if (!dxApp->popGameState().wasSuccessful()) return std::runtime_error("Critical error: Unable to pop new key binding state!"); return false; // notify stack change};This button is as easy as the back button. We simply save the key bindings using boost serialization as described in a previous tutorial on marshalling game commands and then pop the state and resume the key bindings menu.
Listening for User Input
Once the NewKeyBindingState starts, we tell the input handler to start listening for user input.
util::Expected<bool> NewKeyBindingState::onNotify(input::InputHandler* const ih, const bool listening){  if (!listening)  {    // get active key map    if (!isPaused)      return handleInput(ih->activeKeyMap);  }  else  {    // got new chord    ih->disableListening();    setNewChord(ih->newChordBindInfo);  }
  // return success  return true;}
The input handler then captures any user input that was not already mapped to a (different) game command and notifies us to save the new chord:
void InputHandler::update(){  // clear out any active bindings from the last frame  bool isActive = false;  activeKeyMap.clear();
  // loop through the map of all possible actions and find the active key bindings  for (auto x : keyMap)  {    if (x.second->chord.empty())      continue;
    // test chord    isActive = true;    for (auto y : x.second->chord)    {      if (getKeyState(y.keyCode) != y.keyState)      {        isActive = false;        break;      }    }    if (isActive)      activeKeyMap.insert(std::pair<GameCommands, GameCommand&>(x.first, *x.second));  }
  // if there is an active key map  if (!activeKeyMap.empty())  {    // notify the currently active game states to handle the input    notify(this, false);  // false: normal game input; was not listening to specially requested user input  }  else  {        if (listen)    {      // we are listening to specially requested user input      newChordBindInfo.clear();
      // give the user the ability to "unbind" a key by pressing the "ESCAPE" key      if (isPressed(VK_ESCAPE))      {        listen = false;      // stop listening ; produce normal input again        notify(this, true);    // true: was listening to specially requested user input        return;          // all done      }
      // now loop through all possible keys and check for changes      for (unsigned int i = 0; i < 256; i++)      {        // we don't care which one of the shift or ctrl keys was pressed        if (i >= 160 && i <= 165)          continue;
        // push the keys the user is holding down to the chord        if (getKeyState(i) == KeyState::StillPressed)        {          newChordBindInfo.push_back(BindInfo(i, getKeyState(i)));          continue;        }
        // now add those keys that have been pressed        if (kbm->currentState[i] != kbm->previousState[i]  // only listen to key state changes          && getKeyState(1) != KeyState::JustReleased)  // ignore when the left mouse button is released (as the menu is accessed via left mouse button click)          newChordBindInfo.push_back(BindInfo(i, getKeyState(i)));      }
      // if there is a new chord, we have to make sure that we are not overwriting an already existing chord      if (!newChordBindInfo.empty())      {        // check for new chord to not overwrite other commands        bool newChord = true;        for (auto x : keyMap)        {          // no chord at all -> continue                    if (x.second->chord.empty())            continue;
          // different sizes -> can't be the same chord -> continue          if (x.second->chord.size() != newChordBindInfo.size())            continue;          else          {            // check all key bindings            bool allTheSame = true;            for (unsigned int i = 0; i < newChordBindInfo.size(); i++)            {              if (x.second->chord[i].keyCode != newChordBindInfo[i].keyCode)              {                // the keys are different                allTheSame = false;                break;              }              else              {                // the keys are the same; check for their states                if (x.second->chord[i].keyState != newChordBindInfo[i].keyState)                {                  // the states are different -> check for pressed <-> released mismatch                  if (x.second->chord[i].keyState == KeyState::JustPressed && newChordBindInfo[i].keyState == KeyState::JustReleased)                  {                    // do nothing                    continue;                  }                  allTheSame = false;                  break;                }              }            }            if (allTheSame)              newChord = false;          }        }

        if (!newChord)          // the just pressed chord is already bound to a command -> clear and restart          newChordBindInfo.clear();        else        {          // we have a new chord ; notify if at least one of the keys was released, else: continue          // this is necessary to capture multipe key presses, such as "CTRL" + A          bool sendNotification = false;          for (auto x : newChordBindInfo)            if (getKeyState(x.keyCode) == KeyState::JustReleased)            {              sendNotification = true;              listen = false;              break;            }          if (sendNotification)          {            for (auto& x : newChordBindInfo)            {              if (x.keyState == KeyState::JustReleased)                x.keyState = KeyState::JustPressed;            }            notify(this, true);          }        }      }    }  }}
Associating the new chord with the game command is done as follows:
util::Expected<void> NewKeyBindingState::setNewChord(std::vector<input::BindInfo>& bi){  // disable listening  this->keySelected = true;
  // store new chord  newChord = bi;
  // show new chord  std::wostringstream text;  if (newChord.empty())    text << "New Key" << std::endl << L"not bound";  else  {    text << "New Key" << std::endl;    for (unsigned int i = 0; i < bi.size(); i++)    {      if (i != bi.size() - 1)        text << dxApp->getKeyName(bi[i].getKeyCode()).get() << L" + ";      else        text << dxApp->getKeyName(bi[i].getKeyCode()).get();    }  }
    ...
    // change game command  commandToChange->setChord(newChord);  return true;}
And that’s it, we now have a fully functional game menu.
You can download the source code from here.
In the next tutorial, although I previously said that we won’t elaborate on HUDs yet, we will at least modify our state stack to allow HUDs, as the HUD is drawn over the game state without pausing the game.
References
Literature
(in alphabetic order)
- Game Programming Algorithms, by Sanjay Madhav
- Game Programming Patterns, by Robert Nystrom
- Microsoft Developer Network (MSDN)
- Tricks of the Windows Game Programming Gurus, by André LaMothe
- Wikipedia