Lambda Buttons
“Most people have their buttons,” Eustace continued.
– James Purdy, Eustace Chisholm and the Works
Every game, I suppose, requires a menu system with buttons to let the user navigate through the different scenes of a game. On the computer or on a console, a button must at least have two states, unselected and selected, to make sure the user knows exactly which button is currently selected. A third state, clicked, is optional. To implement this, we use our animated sprite class.
The button class itself is fairly straightforward, it will have, among necessary internal variables, an animated sprite and a lambda function:
Lambda Functions
Lambda functions were introduced by the C++-11 standard. They allow us to write anonymous functions that we can use instead of complete structs or classes, thus allowing us to avoid the need to create complete class and function definitions.
As an example, consider a function to compute the square of a number. In C++-11, this can be done with a lambda function as follows:
auto squareLambdaFunction = [](int n) {return n * n; };int nineSquared = squareLambdaFunction(9);After the auto keyword, to let C++ decide on the return type, and naming our function as we desire, the square brackets indicate that what follows is intended to be a lambda function. Inside the parentheses, as always, we can define a list of arguments to be received by the function, which can be omitted altogether if there are no arguments, meaning that we do not need to write () if there is no input, unlike for regular functions. Finally, there is the regular body of code inside the braces, just as for normal functions.
Capture Semantics
Let us try a more difficult example. Assume that we have list of strings, and we now want to create another list with the sizes of those strings using a lambda function to evaluate the size of each string and pushing it on the new list:
std::wstring test1 = L"bell0bytes";std::wstring test2 = L"Symplectic Topology is the best!";std::wstring test3 = L"Deutscher Meister wird nur der BVB!";std::vector<std::wstring> stringVector;stringVector.push_back(test1);stringVector.push_back(test2);stringVector.push_back(test3);The obvious old C++ way would be to populate the new vector as follows:
std::vector<size_t> stringSizeVector;for (auto s : stringVector) stringSizeVector.push_back(s.size());Let us try to do that with lambda functions. Obviously, our lambda function will get a string as input, and it has to return the size of the string:
std::vector<size_t> stringSizeVector;std::for_each(stringVector.begin(), stringVector.end(), [](std::wstring s) { stringSizeVector.push_back(s.size()); });If we try this, the compiler complains: error C3493: ‘stringSizeVector’ cannot be implicitly captured because no default capture mode has been specified.
Thus, there is one more detail to talk about: how do we pass parent objects by reference? Well, the square brackets indicate how the variables are captured:
- []: no capture.
- [&]: capture all by reference.
- [=]: capture all by value.
Capturing variables by value will naturally prevent them from being modified within the function. Not capturing them prevents them from even being accessed. Let us try the above code again. Using capture by value obviously won’t work, as we have to push something on the vector, and thus we have to use capture by reference:
std::vector<size_t> stringSizeVector;std::for_each(stringVector.begin(), stringVector.end(), [&](std::wstring s) { stringSizeVector.push_back(s.size()); });In addition, one can specify lists of variables to capture. If a variable is preceded by a &, it is captured by reference. Otherwise it is captured by value:
int foo, bar, lol;[&foo, bar, &lol](int i) {foo = i; lol += bar; };Here, foo and lol are captured by reference, while bar is captured by value. No other variables from the parent scope are accessible at all.
To access all members of an enclosing class, the this keyword can be used. Note that this technique also works when passing a lambda function as an argument to a function in a different: the captured class will be the one the lambda function was originally defined in.
As a last technique, one can also specify that all variables should be captured by value or by reference, minus a few exceptions:
int foo, bar, lol;[&, bar](int i) {foo = i; lol += bar; };Generalized Lambda Functions
The C++-14 standard introduced the concept of generalized lambda functions, which means that we are now allowed to use auto as the type for input parameters. We could now write our squaring function as follows:
auto squareLambdaFunction = [](auto n) {return n * n; };We can now use our lambda functions for integers as well as for floats and doubles, for example, without recurring to templates!
This is quite the powerful technique when combined with standard containers. As an example, we will sort and print the content of a vector using generic lambda functions:
std::vector<int> vectorOfIntegers;for (unsigned int i = 0; i < 100; i++) vectorOfIntegers.push_back(std::rand() % 1000);std::sort(vectorOfIntegers.begin(), vectorOfIntegers.end(), [](auto n, auto m) {return n > m; });std::for_each(vectorOfIntegers.begin(), vectorOfIntegers.end(), [](auto n) {std::cout << n; });Okay, to be honest, there is an even easier way to do this, using a predefined function from C++-14, but I am sure you can see why lambda functions can be a very useful and powerful tool to have in our arsenal:
std::vector<int> vectorOfIntegers;for (unsigned int i = 0; i < 100; i++) vectorOfIntegers.push_back(std::rand() % 1000);std::sort(vectorOfIntegers.begin(), vectorOfIntegers.end(), std::greater<>());std::for_each(vectorOfIntegers.begin(), vectorOfIntegers.end(), [](auto n) {std::cout << n; });So much for lambda functions. They are easy to use and definitely handy. Now let us create menu buttons with them!
The Button Class
As we have already said, on the computer, a button must at least have two states, unselected and selected, to make sure the user knows exactly which button is currently selected. A third state, clicked, is optional. To implement this, we obviously use our animated sprite class together with our new weapon, the lambda functions.
We use a lambda function returning a boolean to be able to notify the state manager when a state is added or removed from the queue. Returning false signifies that the state stack was changed.
// enumerate all possible button statesenum ButtonStates { Deselected, Selected, Clicked};
class Button{private:  std::wstring name;              // the name of the button  graphics::AnimatedSprite* sprite;      // the graphics of the button  ButtonStates state;              // state of the button  std::function<bool()> onClick;        // function to be replaced by a lambda function later on to define what happens when the button is clicked
public:  // constructors and destructors  Button(std::wstring, graphics::AnimatedSprite* const);  Button(std::wstring, graphics::AnimatedSprite* const, std::function<bool()>);  ~Button();
  // button interaction  void select();  void deselect();  bool click();  void setOnClickFunction(std::function<bool()> onClickFunction);
  // draw button  void draw();  void drawCentered(const float scaleFactor = 1.0f, const float offsetX = 1.0f, const float offsetY = 1.0f);
  // update button  void update(const double deltaTime);};
Constructors and Destructors
The constructors and destructor are straightforward:
Button::Button(std::wstring name, graphics::AnimatedSprite* const sprite) : name(name), sprite(sprite), state(ButtonStates::Deselected){ }
Button::Button(std::wstring name, graphics::AnimatedSprite* const sprite, std::function<bool()> onClick) : name(name), sprite(sprite), onClick(onClick), state(ButtonStates::Deselected){ }
Button::~Button(){  onClick = []() { return true; };  delete this->sprite;}
Draw
To draw the buttons, we can call the draw functions of the sprite class:
void Button::draw(){  this->sprite->draw();}
void Button::drawCentered(const float scaleFactor, const float offsetX, const float offsetY){  sprite->drawCentered(scaleFactor, offsetX, offsetY);}
Update
Updating the button animation is once again as easy as calling the sprite update method:
void Button::update(const double deltaTime){ sprite->updateAnimation(deltaTime);}Interaction
Interacting with the buttons is easy as well. For those examples we assume the sprite sheet to have the deselected animations in the first row and the selected animation frames in a second row.
void Button::select(){  state = ButtonStates::Selected;  sprite->changeAnimation(1);}
void Button::deselect(){  state = ButtonStates::Deselected;  sprite->changeAnimation(0);}
bool Button::click(){  state = ButtonStates::Clicked;  return onClick();}
void Button::setOnClickFunction(std::function<bool()> onClickFunction){  onClick = onClickFunction;}
Notice that when the button is clicked, we call the private onClick function, which was either initialized by the constructor or set by the setOnClickFunction method.
A Game Menu
As an example, let us add a few buttons to the main menu state. First, we have to define a double linked list to store all the buttons:
namespace UI{  class Button;
  class MainMenuState : public core::GameState  {  private:        ...
        // the menu buttons    std::deque<Button*> menuButtons;    unsigned int currentlySelectedButton;
    ...  protected:    ...
  public:    ...
        util::Expected<void> initializeButtons();        // initialize the menu button graphics
    ...  };}
We will now add three buttons to the menu: a play, an options and a quit button. I am sure you can figure out what each button is supposed to do on your own. I downloaded the following sprites from OpenGameArt, created by soundemperor.
As an example, here is the code for the Play Button:
util::Expected<void> MainMenuState::initializeButtons(){  // set play button animation cycles  std::vector<graphics::AnimationCycleData> animationCycles;  graphics::AnimationCycleData cycle;  graphics::AnimationData* animations;
  // cycle  cycle.name = L"Play Button Deselected";  cycle.startFrame = 0;  cycle.numberOfFrames = 1;  cycle.width = 300;  cycle.height = 80;  cycle.paddingWidth = 0;  cycle.paddingHeight = 20;  cycle.borderPaddingHeight = cycle.borderPaddingWidth = 0;  cycle.rotationCenterX = cycle.rotationCenterY = 0.5f;  animationCycles.push_back(cycle);
  cycle.name = L"Play Button Selected";  cycle.startFrame = 0;  cycle.numberOfFrames = 30;  cycle.width = 300;  cycle.height = 80;  cycle.paddingWidth = 0;  cycle.paddingHeight = 0;  cycle.borderPaddingHeight = cycle.borderPaddingWidth = 0;  cycle.rotationCenterX = cycle.rotationCenterY = 0.5f;  animationCycles.push_back(cycle);
  // create play button animations  try { animations = new graphics::AnimationData(d2d, L"O:/Documents/GitLab/bell0tutorial/bell0tutorial/Art/playButton.png", animationCycles); }  catch (std::runtime_error& e) { return e; }
  // set lambda function  auto onClick = [this]  {    this->isPaused = true;    if (!dxApp->gameIsRunning)      dxApp->changeGameState(&core::PlayState::createInstance(dxApp, L"Game"));    else      dxApp->popGameState();    return false;  };
    // add button to the list  menuButtons.push_back(new Button(L"Play Button", new graphics::AnimatedSprite(d2d, animations, 0, 24), onClick));
  // clear animation data  animationCycles.clear();  std::vector<graphics::AnimationCycleData>(animationCycles).swap(animationCycles);
    ...
  // set active button  menuButtons[0]->select();
    ...}
The only new part is the definition of the onClick function:
auto onClick = [this]{ this->isPaused = true; dxApp->changeGameState(&core::PlayState::createInstance(dxApp, L"Game")); return false;};Recalling our brief introduction to lambda functions, we recognize that [this] signifies that we are capturing the entire class and no () means that we have no input parameters to our function. The function itself simply create a new game state, the play state, and puts it on the stack. The function returns false to notify the stack manager that the state of the stack has changed. That’s it! Easy!
Navigation
We can navigate through our menu using either the keyboard or the mouse. To be able to bind multiple keys to a single command, I changed the keyMap to an unordered multimap.
Keyboard
Using the keyboard to navigate through the menu is straightforward, we simply increment or decrement the pointer to the currently active button, and when a button is clicked, we call its onClick method:
util::Expected<bool> MainMenuState::handleInput(std::unordered_map<input::GameCommands, input::GameCommand&>& activeKeyMap){  // act on user input  for (auto x : activeKeyMap)  {    switch (x.first)    {    case input::Select:      // activate currently selected button      return menuButtons[currentlySelectedButton]->click();;
    case input::MoveDown:      // select next button in the list      menuButtons[currentlySelectedButton]->deselect();      if (currentlySelectedButton < menuButtons.size() - 1)        currentlySelectedButton++;      else        currentlySelectedButton = 0;      menuButtons[currentlySelectedButton]->select();      return true;
    case input::MoveUp:      // select next button in the list      menuButtons[currentlySelectedButton]->deselect();      if (currentlySelectedButton > 0)        currentlySelectedButton--;      else        currentlySelectedButton = (unsigned int)menuButtons.size()-1;      menuButtons[currentlySelectedButton]->select();      return true;
    case input::GameCommands::ShowFPS:      dxApp->showFPS = !dxApp->showFPS;      break;    }  }
    return true;}
Mouse
Using the mouse is a bit more difficult, as we have to get the mouse position and do something once the mouse hovers over the region of a button. To facilitate using the mouse, I added a rectangle to each button. Each time the button is drawn, the rectangle is updated with the position of the button (which has to be computed anyway).
Now if the mouse is active, we can simply check if the mouse is hovering over a button and if that is the case, we select that button:
if (dxApp->activeMouse){  // get mouse position  long mouseX = dxApp->getMouseX();  long mouseY = dxApp->getMouseY();
  // check if mouse position is inside button rectangle  unsigned int i = 0;  for (auto button : menuButtons)  {    D2D1_RECT_F rect = button->getRectangle();    if (mouseX > rect.left && mouseX < rect.right)      if (mouseY > rect.top && mouseY < rect.bottom)      {        if (currentlySelectedButton != i)        {          // deselect current button          menuButtons[currentlySelectedButton]->deselect();
          // select button          button->select();          currentlySelectedButton = i;        }      }    i++;  }}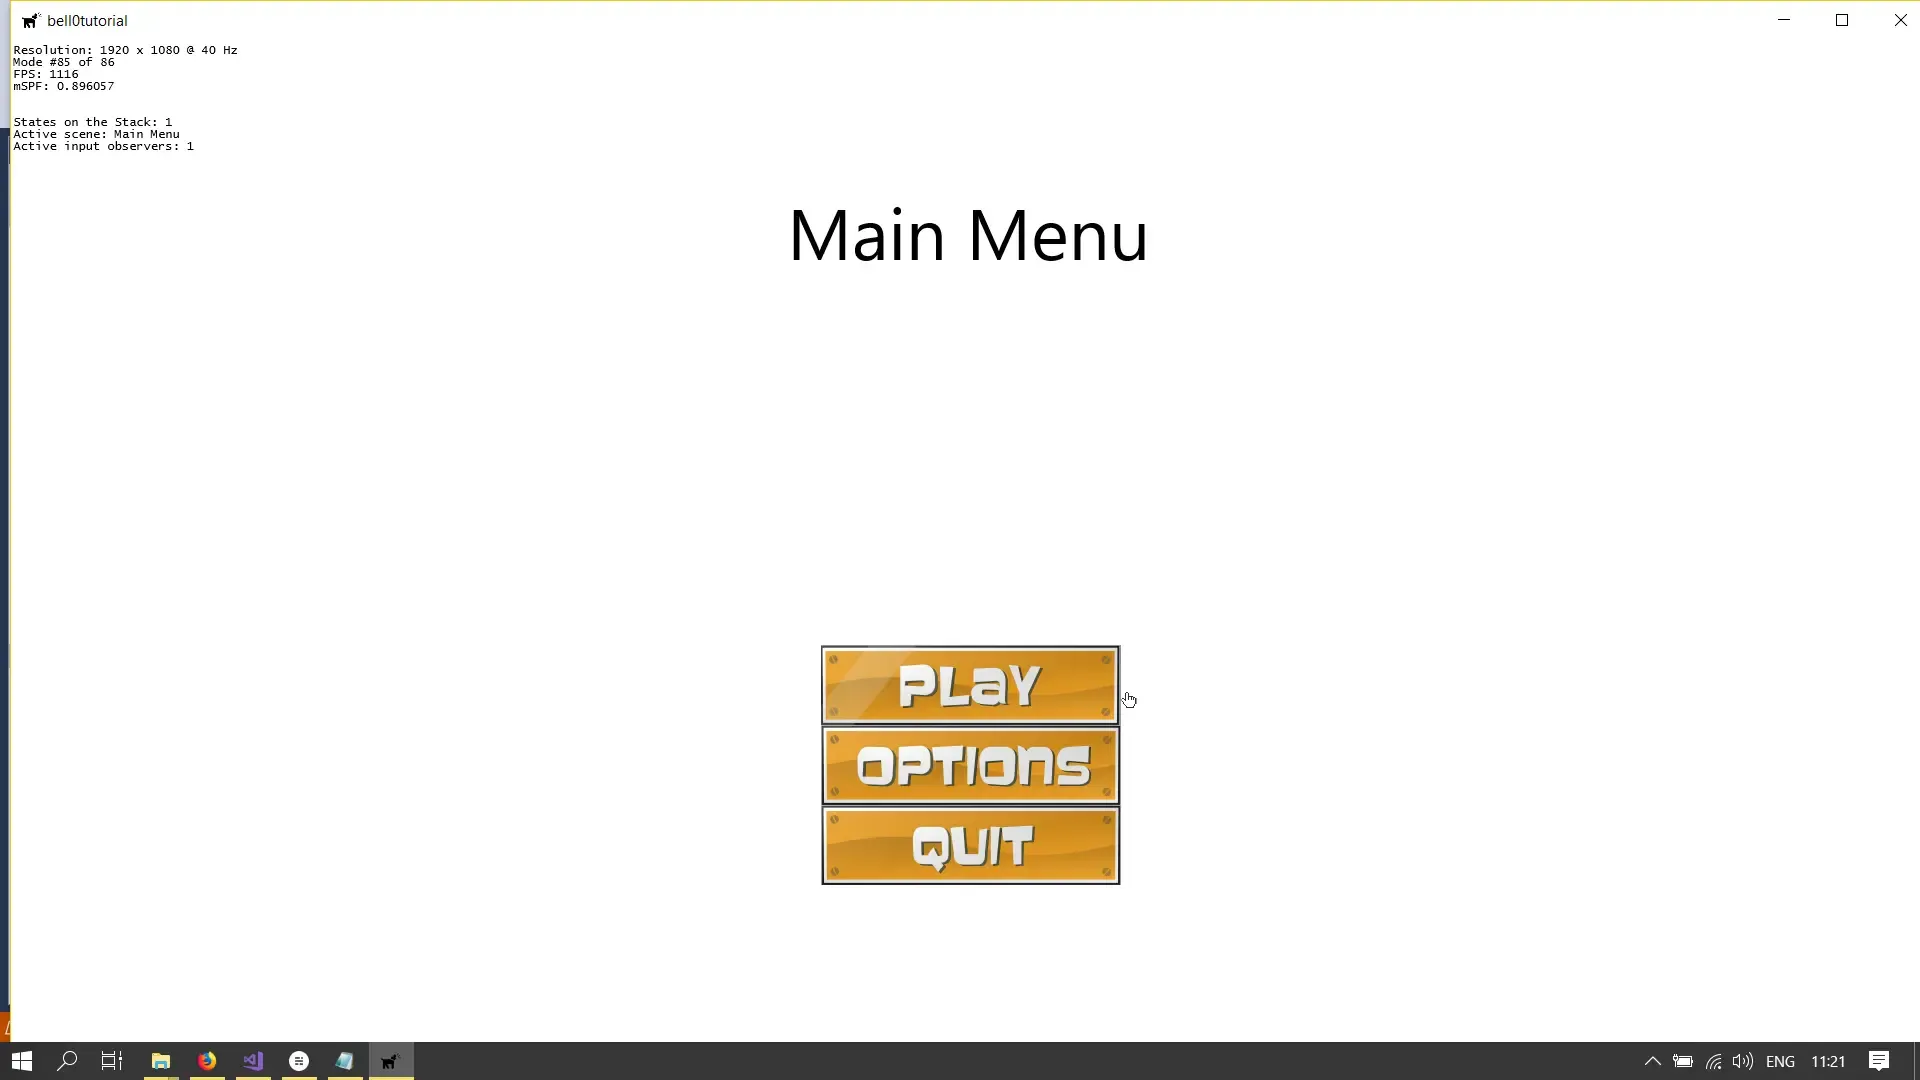
You can download the source code here.
In the next tutorial, we will add a menu to allow the player to choose their own key bindings.
References
Literature
- Game Programming Algorithms, by Sanjay Madhav
- Game Programming Patterns, by Robert Nystrom
- Microsoft Developer Network (MSDN)
- Tricks of the Windows Game Programming Gurus, by André LaMothe
- Wikipedia